Signed in as:
filler@godaddy.com

Thank you for purchasing the Dogbone 3.0 for Tumblers (and more!).
Pro Tip: Do not throw the package away! It doubles as a drawer organizer.
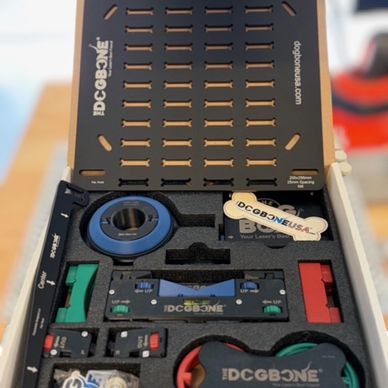
Inside the box are the pieces you need to work with and minimally assemble your Dogbone 3.0.
Disclaimer: We do not know how your individual laser is operated. You accept all risks when installing and using a Dogbone 3.0 on your machine. You are 100% responsible for your safety.
All that said: You will need to make sure you use your manufacturers suggested Personal Protective Equipment (PPE) during instillation and use!

We use Lightburn which is pictured in the image. We have drawn a non-marking "Tool Path" straight line and framed it to our galvo.
WARNING: It projects a beam of light so use caution and all your PPE.
The matte finish Dogbone 3.0 base is installed with the side with the engraving up. You can leave the bottom film on if you wish. Inside your kit are 4 thumbscrews based on the DB3.0 Base Variant (Split/Compact, Gweike, xTool) that you selected. Pictured are the M6x12mm grey capped thumbscrews.
Engraved in the center of your DB3.0 base is a straight line. You will align your base to your laser's projected tool path line. There is a variety of holes for thumbscrews cut into the base. They will work with your manufactures installed breadboard tapped hole configurations and they will also work with Blackwell Engineering bases.
Once you have the DB3.0 base line aligned with your projected non-marking tool path line tighten the thumbscrews, but DO NOT GRONK.
Insert the backstop. It is adjustable. There is a "blue" button on the side. Press in and expand the Adjustable backstop to desired height.
In your DB3.0 kit there are "V" inserts in blue, "U" inserts in green, and Flat inserts in red. We default install the "V" inserts as pictured above. You can easily remove and install the desired pieces as you need by pulling them out and placing them in. There are arrows (->) to show you orientation.
Insert the risers to to your desired position based on the size of the object you are engraving. You can adjust height and level using the "blue" knobs with two-hands turning them in the direction labeled for up. There should be slight resistance but if you are having to gronk it to move it, you are going the wrong direction.
The wings on the outside of each riser are adjustable two ways. The "green" knobs adjust it up and down. Again, slight resistance is designed. The wing tips can be set in or out depending on your needs. They are designed to simply twist off and on. DO NOT GRONK.
In this bag there are two (2) bubble levels. The first is a magnetic level for on top of your tumbler to adjust level. The second is the rectangle bubble level for the Lid Adapter.
Just set the rectangle bublble level into the Lid Adapter.
Inside your box next to the Lid Adapter is the removable Tail. You will attach it to the lid adapter and gently turn it till the arrow looks like this.
Your Lid Adapter has a center piece that unscrews and you can swap rings. Blue are for JDS Industries 30oz (as well as others), green are for 20oz (as well as others), and red is for skinny (as well as others) tumblers.
The rings and center piece screw into the Lid Adapter. You can snug it, but there is NO REASON TO GRONK IT!
In the event that you did gronk it too tight, in your box is the Dogbone Tool. Place in the slots and loosen the center of the Lid Adapter.
Your Lid Adapter has been designed and installed with o-rings that work with JDS Industries tumblers (as well as others). It should fit snug. The hole in the top is there for a reason. If the Lid Adapter does not fully seat, check the o-ring for twisting and/or remove your hand from the hole when attaching.
Your Lid Adapter has two raised areas on it. Those are for your Center Finder. If you have a tumbler with already logo or engraving on it, you can quickly find the center of the logo/engraving, adjust your DB3.0 Lid Adapter to it and continue.
Place your tumbler on the adjustable DB3.0 Risers and up against the Adjustable Backstop!
On your risers there are "blue" adjustment knobs. You will get to know these well. Take your magnetic level and set on the tumbler! Using the blue adjustment knobs level your tumbler. Most tumblers will let the Lid Adapter sit flush against the Adjustable Backstop. However, some stemless wine glasses or odd shaped tumblers may not be flush. That is ok. The backstop is a repeatable reference and only contact is key.
With your tumbler on either the left or right wing, you will use the "green" adjustment knob to raise or lower the wing to make it level.
Adjust the opposite side wing using the green knob. Now both sides of your tumbler are aligned, level, and good to go! You can now laser 1 or 1,000 two sides all the same (as long as it is the same tumbler size/model/etc).
Using your software you will set up the image/vector as you would. We use Lightburn and cylinder correction found under "Tools." We do not give laser training, but there are a lot of great free resources on the topic on popular sites like Youtube, Facebook, Lightburn tutorials, etc.
You do not need the lid adapter for handled tumblers. Instead you can adjust the wing tips in or out for the size of the tumbler.
If you put the magnetic level across the tumbler handle as shown, you can then use the green knobs to level each side.

Your DB3.0 Kit includes four (4) of our In/Out wings. They have "red" knobs. To add to the Risers, remove the wing tips. Hold on to them as they get installed on the In/Out wings.
Now you can laser all sorts of items using the combinations of the In/Out/Up/Down of the wings, the V, U, and Flat Inserts, the Adjustable Baskstop and more.
Even the packaging is Purposefully Designed if you need a drawer organizer or just want to store it in the box. There will be a variety of future and current accessories for your Dogbone ystem.
Need More Help? Join our Facebook Group!

Using a laser requires training, personal protective equipment (PPE), correct ventilation, safety precautions, and more.
You are 100% responsible for your safety, wearing PPE, ventilation, product placement, product misalignment, and damage to your products or yourself when using the Dogbone.
Note; WE DO NOT GIVE TRAINING ON LASERS, LASER SOFTWARE, OR LASER SETTINGS as part of or a condition of a sale on dogboneusa.com.